Saturday, February 23, 2019

Saturday Showcase - Just A Note


It's Saturday, friends and time for another Saturday Showcase with Papertrey Ink. Today we are showcasing the gorgeous floral set, Botanical Bounty. If you know me or have been following me for awhile then you know how much I love creating with flowers. This set is one that has a permanent spot on my desk … I love it THAT much! 


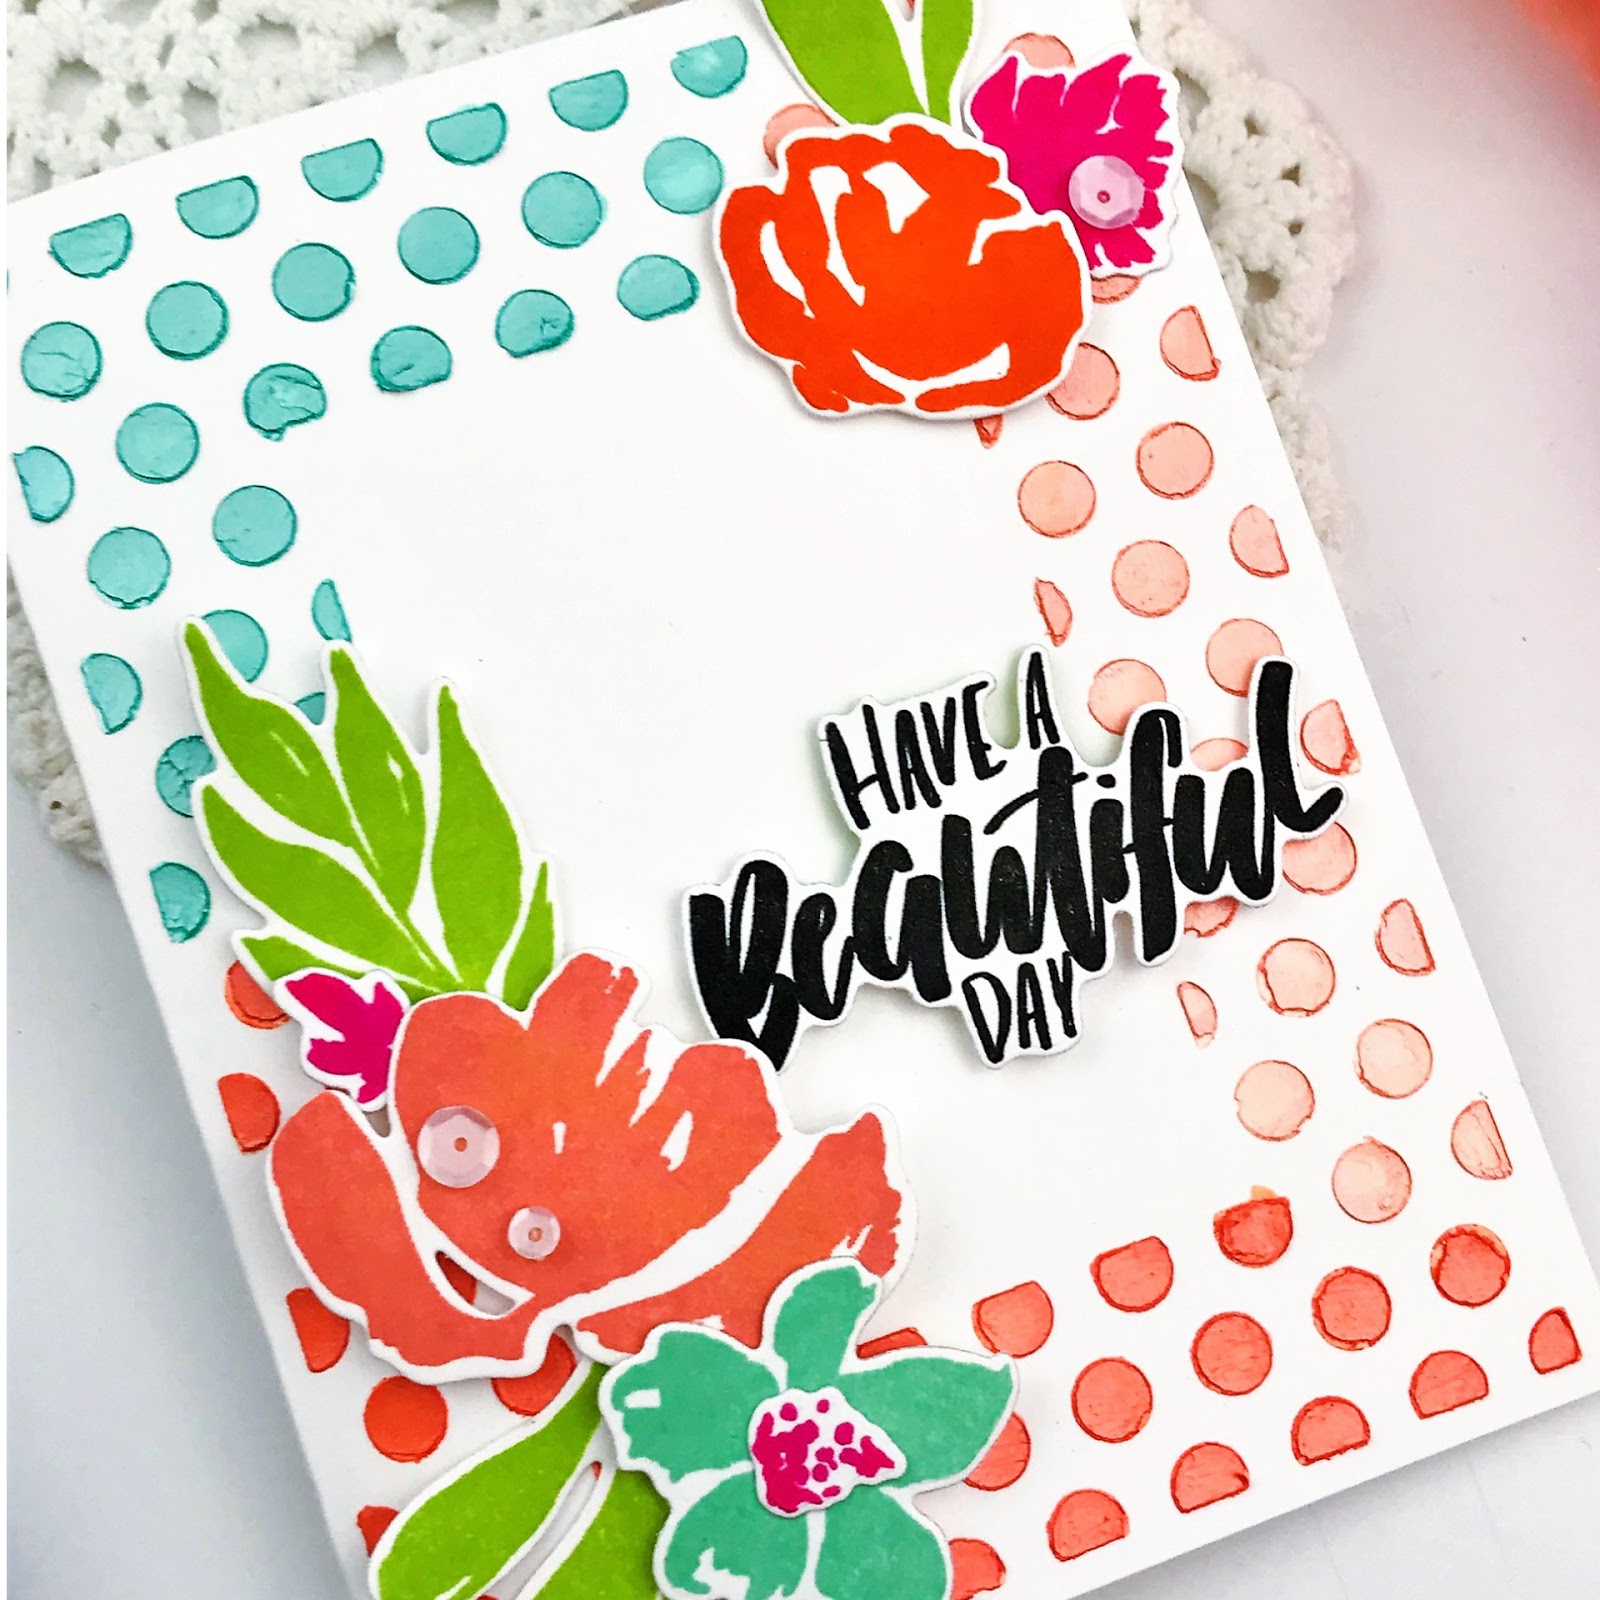
I stamped and die-cut a variety of the images in the set … I listed all of the colors I used in my supply list at the end of my post. I wanted all of those colors to POP off my card front, so I chose to use a white card base for them to sit on. I attached some directly to my card base and some I popped up with dimensional foam. I think just popping a couple of images up on any card adds just that little 'extra' you need on a project.


The sentiment 'just a note' was stamped and die-cut using the Botanical Bounty Sentiments Stamp Set  and Botanical Bounty Sentiments Die Collection.


A few clear sequins complete it! No matter if you are creating a sweet and simple card with this set, like I did for today, or something a bit more embellished and layered, you will end up with a beautiful end result!

I hope you enjoyed todays showcase, friends. Wishing you a happy day ahead!

xo,
Melissa


STAMPS: Botanical Bounty, Botanical Bounty Sentiments
INK: Sweet Blush, Raspberry Fizz, Berry Sorbet, Pure Poppy, Summer Sunrise, True Black
PAPER: Stampers Select White
DIES: Botanical Bounty, Botanical Bounty Sentiments
OTHER: clear sequins

Friday, February 22, 2019

Design Team Tips - Word Die Background

It's Friday... YAY! I'm here today to share a Design Team Tip with you for Papertrey Ink. Let's talk word dies this morning. I think we are all big fans of creating with them and most times they are used just to complete your project by adding a sentiment. I'm stretching one word die a little bit further today ...


How about using that one word die to create a whole background for your card base? I've done this in the past a few times and always love the end result. The die I chose is from Word to Live By: Inspire, but Papertrey has such a wide variety of word dies that you could do this with. You can see some of them HERE!


It may be a bit time consuming to attach all of the die-cuts to your card base, but it was easy peasy to create this 'inspire' background. I chose to do white on white and then added lots of color to my butterfly, from the Butterfly Folk Stamp Set and Butterfly Folk Die Collection.


I added dimensional foam behind my butterfly to give my card a little dimension and then layered her with flowers, leaves and the rest of the sentiment, from the Words to Live By: Inspire Mini Stamp Set.


I hope I've inspired you a little and you'll try creating your own die-cut background. I would love to see what you create! 

Have a wonderful Friday, friends!

xo,
Melissa


STAMPS: Butterfly Folk, Words to Live By: Inspire Mini
INK: Pale Peony, Melon Berry, Hibiscus, Green Parakeet, Fresh Snow
PAPER: Stampers Select White, True Black
DIES: Butterfly Folk, Words to Live By: Inspire
OTHER: clear dew drop

Tuesday, February 19, 2019

Transformation Tuesday - Hello Beautiful

Hey there, friends! I'm happy to be back hosting Transformation Tuesday with Papertrey Ink! My card for today is pretty CAS and was inspired by the card you see below.


You can find my original post right HERE!

The colorful stripes I created on my original card just make me so happy that I thought I would recreate it and turn today's card into a card you could send any day of the year.

I chose rainbows colors and used the Skinny Mini Banners to create my background. I listed all of the cardstock colors I used in the supply list below. 


After all of my banners were attached to my card base, I stamped and die-cut the flower and leaves, from Stitching Garden. The flower was attached with dimensional foam and the leaves were then tucked underneath.


Hello, Beautiful was stamped and die-cut using the Penned Elegance ll Stamp Set and Penned Elegance ll Die Collection. That was popped up with dimensional foam, as well.


I love how happy this card is and can imagine using so many different images in place of the flower or tree. Just goes to show how far one simple little card layout can be transformed and recreated for so many different occasions! 

Pop on over to the Papertrey Ink blog where you can link your own Transformation Tuesday card for a chance to win a gift certificate!

Thanks so much for sharing part of your day with me!

xo,
Melissa


STAMPS: Stitching Garden, Penned Elegance ll
INK: True Black, Pale Peony, Limeade Ice
PAPER: Stampers Select White, Pure Poppy, Orange Zest, Bright Buttercup, Limeade Ice, Hawaiian Shores, Lilac Grace, Pale Peony
DIES: Stitching Garden, Penned Elegance ll, Skinny Mini Banners
OTHER: sequins


Saturday, February 16, 2019

Happy, Happy Easter

Hello, friends! I have a bit of Easter inspiration for you today. A few of us on the Papertrey Ink design team are sharing projects with you using Bunny Blessings. Such a sweet, sweet set filled with bunnies, butterflies, flowers and eggs … all the things you need to create your spring time cards.


I started by creating a border around my white card base using one of the flowers in the set. I stamped it in four different colors … Lovely Lady, Hibiscus, Aqua Mist and Harvest Gold and then filled in around them with Limeade Ice leaves. 


I stamped my bunny in Aqua Mist and butterfly in Hibiscus. Those were both die-cut and popped up with dimensional foam. 'Happy' is from the Bold Borders: Flare Die Collection


To finish, I die-cut white flowers, layered two together and attached them around my border. A few colorful sequins were added to complete it! 


Thanks so much for visiting today. Pop on over to the Papertrey Ink blog to see more inspiration from the rest of the gals!

Have a wonderful day, friends!

xo,
Melissa


STAMPS: Bunny Blessings
INK: Fresh Snow, Aqua Mist, Harvest Gold, Lovely Lady, Hibiscus, Limeade Ice
PAPER: Stampers Select White, True Black
DIES: Bunny Blessings, Bold Borders: Flare
OTHER: sequins (Pretty Pink Posh)


Thursday, February 14, 2019

Throwback Thursday - Apple Prints

Good morning, friends! It's Throwback Thursday with Papertrey Ink and it's also Valentine's Day. I'm a girl who is a big, big fan of hearts and creating with them. That's just what I think of when I think of a day dedicated to all things love. But Valentine's Day doesn't have to just be filled with hearts! 

Today, I'm reaching waaaay back to a stamp set that is near and dear to my heart. One that I designed many years ago, but is still one of my favorites, Apple Prints. I created two cards for you today that would be perfect for giving to someone special, so let's jump right in.


I kept my first card sweet + simple. A white background with colorful apples popping off the side that were stamped and then die-cut using the Apple Prints Die Collection. I attached a few of them directly to my card front and the other two I popped up with dimensional foam.


I stamped my sentiment, in Fresh Snow ink, onto a piece of True Black cardstock and popped that up with more dimensional foam.


Above my sentiment I added 'Love' that was die-cut using the Bold Borders: Love Die Collection. To finish off my first card, I added a few colorful sequins.


I stuck with the same color combination for card #2. I used the Pierced Feature Frames and die-cut them out of the following colors … Bright Buttercup, Orange Zest, Raspberry Fizz and Sweet Blush. Those were all layered and attached to my white card base. 


I added my die-cut apples … a plain white one and a Sweet Blush one on top and then the flowers next. To create the leaves for my flowers I simple stamped and die-cut the apple stem a few times and then trimmed the leaves off and tucked them underneath the flowers.


More colorful sequins complete my second card!

Thanks so much for stopping by today! If you have the Apple Prints Collection, I hope that I've inspired you to pull it out again and do a little creating with it.

xo,
Melissa


APPLE OF MY EYE:
STAMPS: Apple Prints
INK: Fresh Snow, Sweet Blush, Bright Buttercup, Hibiscus, Orange Zest, Raspberry Fizz, Green Parakeet
PAPER: Stampers Select White, True Black
DIES: Apple Prints, Bold Borders: Love
OTHER: sequins (Pretty Pink Posh)

TO THE CORE:
STAMPS: Apple Prints
INK: Fresh Snow, Sweet Blush, Bright Buttercup, Raspberry Fizz, Green Parakeet
PAPER: Stampers Select White, True Black, Sweet Blush, Raspberry Fizz, Orange Zest, Bright Buttercup
DIES: Apple Prints, Pierced Feature Frames
OTHER: sequins (Pretty Pink Posh)

Saturday, February 09, 2019

Some Bunny Loves You


Happy weekend to you, crafty friends! It's all bunnies and chicks today as a few of the Papertrey Ink design team gals share projects using the sweet Huggables: Bunny & Chick collection. These products are perfect for creating cute Easter and spring gift packaging. A few of my teammates have done just that and have created some of the cutest spring packaging I've seen. I did something a little different and created a card for you today!


I wanted to make it look like my bunny was sitting on the front of my card, and I thought hey, her ears would make the perfect arms and legs. I die-cut them, trimmed them and then attached them to her body and it worked perfectly. I finished adding my bits and pieces to her face and created her heart paw prints and then set her aside so I could work on my card base. 


I used the Bold Borders: Diagonal die and die-cut that in four different colors … Hibiscus, Green Parakeet, Melon Berry and Lemon Tart. I trimmed each one, so I could create my colorful border around the edge of my card base. 


I then stamped my sentiment and attached my bunny to the front. To complete it, I added a die-cut carrot to her paw a couple of colorful eggs!

I hope you enjoyed, friends. Be sure and pop on over to the Papertrey Ink Blog to see what everyone else created for you!

xo,
Melissa


STAMPS: Huggables: Bunny & Chick Mini
INK: True Black
PAPER: Stampers Select White, Sweet Blush, Hibiscus, Green Parakeet, Melon Berry, Lemon Tart, Orange Zest, Kraft
DIES: Huggables: Bunny & Chick
OTHER: Pink Peonies sequins, Marshmallow sequins (Pretty Pink Posh)

Tuesday, February 05, 2019

Transformation Tuesday - Happy Spring

Good morning, friends and welcome to Transformation Tuesday with Papertrey Ink! Today is my first time hosting and I'm excited to share my card 'redo' with you. You can find the card that inspired me at the end of my post!


I love a simple design with lots of color and decided to recreate the design below to fit with the upcoming spring season. I stamped images, from Bunny Blessings and A Bit More: Bunny Blessings, onto strips of colorful cardstock and then added dimensional foam to attach them to my card base.  


After the colorful strips were attached, I stamped my sentiment onto a strip of white and attached that just below. I stamped and die-cut the bunny out of Sweet Blush cardstock and then attached her just next to my sentiment.


A flower for my bunny and some hot pink sequins complete it!


My inspiration … you can find my original post right HERE

Now it's your turn to do a little transformation of your own. Be sure to link up your creation on the Papertrey Ink Blog for your chance to win a gift certificate!

Thank you for stopping by!

xo,
Melissa


STAMPS: Bunny Blessings, A Bit More: Bunny Blessings
INK: True Black, Sweet Blush, Hibiscus, Limeade Ice, Aqua Mist
PAPER: Stampers Select White, Sweet Blush, Hibiscus, Limeade Ice, Aqua Mist
DIES: Bunny Blessings
OTHER: Pink Peonies sequins (Pretty Pink Posh)

Friday, February 01, 2019

Papertrey Ink Design Team Tips - Stenciling With Bold Borders

Happy Friday, friends! Today I'm sharing a cheerful card featuring a fun background I created with the Bold Borders: Polka Dots die from Papertrey Ink. I adore these dies and am always looking for different ways to extend the use of products I have on hand. I thought this die was the perfect product to do just that and create my own stenciled background.


All I used to create my stencil was cardstock and the die, that's it! After I die-cut my 4.25 x 5.5 panel, I simply placed it over the front of my card base and taped it down, around the edges, to hold it in place. 


Now for the fun stuff. Using Nuvo Embellishment Mousse I simply filled in all of those polka dots with three different colors. I find the best coverage for this is to use my fingertip. There may be a better way, but this is what works best for me. And because it was card-stock that I used to create my stencil, and it wasn't securely attached to the front of my card base (only the edges), you might find that it doesn't cover perfectly and bleeds underneath the dots a bit. I'm completely ok with that and love how it has somewhat of a rough look.


After the mousse was dry, I moved onto adding my flowers and sentiment.


I used the Botanical Bounty Stamp Set with the Botanical Bounty Die Collection, along with the Botanical Bounty Sentiments Stamp Set and Botanical Bounty Sentiments Die Collection. Melon Berry, Orange Zest, Aqua Mist and Raspberry Fizz were the colors I used for the flowers and Green Parakeet was used for the leaves.


Here's a peek at my card before I added all of the pretty little flowers! Not completely perfect, but perfect enough for me. :)

Thanks so much for stopping by. I hope you have a wonderful weekend!

xo,
Melissa